Using Linux To Edit Fan Videos
Introduction
So you’ve fallen in love with a television show or genre. Perhaps it’s anime (to which I’ve done some fan videos myself), a science fiction drama, or something else. The word “fan” fits you. You know that other fans have made short films using clips from the shows you love. They show off their work at conventions and with other fans online. Now you have idea for one, yourself, that will blow everyone away.
Want to use your Linux system to make fan videos? I’ll get you started.
A guide to video editing in Windows will assume that you’ve gotten all your hardware (including your scroll mouse, used to scroll in Cinelerra) working and optimized, DMA turned on for all your drives, all codecs and libraries (such as DirectX), and that you’re comfortable administrating your system. I will assume the same foundation for this guide to video editing in Linux.
Preparing Your Resources
The Audio Resource
Ripping From A CD
Use cdparanoia, the error-correcting CD ripper for Linux, to get the song from the CD. Numerous frontends exist for this ripper. One of the newest is RubyRipper. Any will give you a directory full of properly named, tagged MP3’s on command. But I digress.
To rip a track using cdparanoia, use:
cdparanoia -w track filenamewav
where track is the number of the track you want to rip.
Processing
Use Audacity if you want to modify the CD track before loading it into Cinelerra.
As with many of the best *nix programs, Audacity’s power is not obvious from its appearance. I recommend reading Transom Tools: Audacity first to see what you’re dealing with, then looking for the many tutorials that have been written. Audacity is widely used to edit podcasts, so many resources exist. Adding fades and safely maximizing volume are trivial for Audacity.
Need audio filters and effects? Try the multitudes of LADSPA plugins. They include reverb, phasing, comb filters, and everything else.
The DVD Video Resource
Viewing The DVD
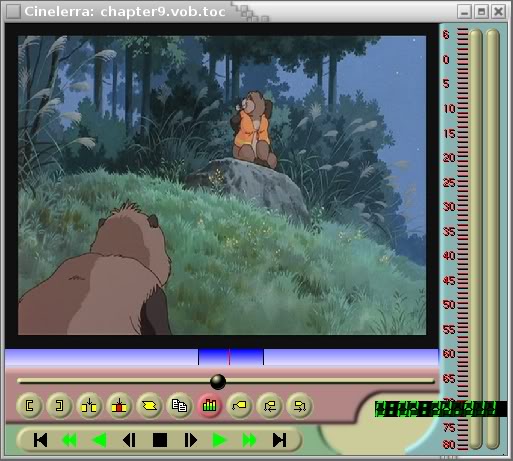
The first step is to watch the DVD. Use xine or VLC. Both are full-featured DVD players that support widescreen, surround sound, deinterlacing and menus.
Write down the numbers representing the titles, chapters and angles of the scenes you want to rip.

In case you’re wondering, I captured xine screenshots by first launching xine with xine -V Xshm.
Ripping The DVD
Install Transcode. Two of its components, tccat and tcdemux, will simultaneously rip the DVD and strip the audio from it. The command line to do so is:
tccat -i /dev/dvd -T Title,StartChapter-EndChapter,Angle | tcdemux -x mpeg2 > chaptername.vob
where Title, StartChapter, EndChapter and Angle are the appropriate numbers.
Then use Cinelerra‘s mpeg3toc to index the ripped vob files. Each index file it generates will have a .toc extension. If you have a directory full of vob files then
for i in *.vob; do mpeg3toc `pwd`/$i $i.toc; donewill index them all.
To prepare title 1, chapter 10, angle 2 from the DVD, for example, takes two commands:
tccat -i /dev/dvd -T 1,10,2 | tcdemux -x mpeg2 > chapter10.vob
mpeg3toc chapter10.vob chapter10.toc
The Captured Video Resource
If you want to capture your footage by writing it to the hard drive as it plays, then you have three options. The first, of course, is to buy a TV turner card and then use MythTV to turn your computer into a PVR. The second is to capture using a camera, a firewire card, and “dvgrab” from Linux DV. The third option is to use MJPEGTools to capture from an MJPEG device.
Editing Your Resources
For the actual editing we’ll use Cinelerra, as it’s free and similar in design to other NLEs (non-linear editors).
Loading Your Resources
Fire up Cinelerra and go to File -> Load Files. Highlight the .wav’s, .toc’s, and any other file you’ll need. Choose “Create new resources only” for the insertion strategy.

These files wil now appear in the “Media” folder of Cinelerra’s Resources Window.

Laying Down The Song
Drag your song from the Resource Window into Audio Track 1.
Laying Down Some Clips
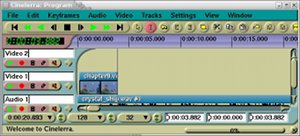
Drag one of your video files into Cinelerra’s Viewer. Drag the ends of the navy blue preview region until it only covers the part you’re interested in. Then set your in–out points and press the splice button. The part between the in-point and the out-point will be sent to the timeline. Cinelerra calls this two screen editing.
- Setting the Preview Region

- Setting the In/Out Points


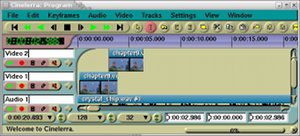
Rearranging Clips
To rearrange clips on the timeline we’ll do some cut-n-paste editing. With Cinelerra in cut-n-paste mode, we select the region of the timeline we want to move. Then we press the “cut” button on the toolbar, move the insertion point to where we want to move the region to, arm only the track we want to paste it to (by shift-clicking its red button), and press “paste” on the toolbar.
- Selecting

- Cutting
- Positioning

- Pasting


Finer Editing
Now go to Settings→Preferences and have a look at how your mouse buttons are set up.

Roll Editing
The button set to drag only one edit (the middle one by default) will perform a roll edit. Use it to drag edit points back and forth. It will move the edit points but not the clips between them.
Slip Editing
The button set to drag source only (by default, the right mouse button) will perform a slip edit. It will leave the edit points unchanged but drag the clip between them back and forth.
Transitions
Cinelerra makes transitions very easy. Simply drag one from the “Video Transitions” folder of the “Resources” window and drag it between two clips.
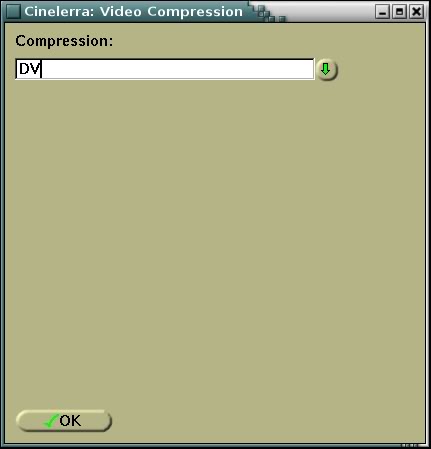
Exporting Your Master Video File
Go to “File→Render» or press Shift-R.
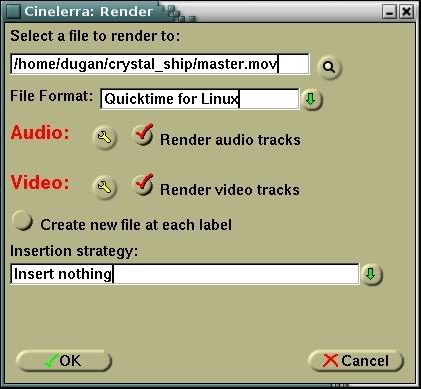
Then press the wrench next to Video and select the DV codec for compression.
If you have a region of the timeline selected then Cinelerra will export only that region. Otherwise, it will export the entire timeline.
In the screenshots above, you’re exporting to a file called master.mov.
Now you’ve finished editing with Cinerra. Close it.
Encoding
To MPEG4
To encode we’ll use mencoder, which is part of MPlayer.
Here are the commands for an Xvid encode with mp3 audio, that can be played by the the Windows version of the divx.com decoder. Note that target_size_in_k needs to be a negative number so that mencoder will read its absolute value as your target size. For example, specifying bitrate=-1790943 will set your target size to 1.7GB. If the number is positive then mencoder will use it as the target bitrate, and that’s not recommended for xvid encodes.
Enter following three commands, one after the other, and change the italicised values to what’s appropriate:
mencoder -oac mp3lame -lameopts preset=128 -ovc frameno -o frameno.avi master.mov
mencoder -oac copy -ffourcc DX50 -vf deinterlacer -ovc xvid -xvidencopts max_bframes=1:cartoon:pass=1 -o /dev/null master.mov
mencoder -oac copy -ffourcc DX50 -vf deinterlacer -ovc xvid -xvidencopts bitrate=-target_size_in_k:max_bframes=1:cartoon:pass=2 -o final.avi master.mov
Now we have our final encoded file.
For the deinterlacer, MPlayer’s documentation currently recommends “vf pp=lb”. Many others are available. Refer to its documentation for more. A Comparision of MPlayer software scaler and filter types and a comparison of Deinterlacing filters are available to help you choose. To test one, play it back with mplayer -vf deinterlacer master.mov. Tap the . key to step through it and see what your master.mov looks like with each one.
If you need to encode a second time, delete the frameno.avi and xvid-twopass.stats files before you do so.
Adding Aspect Ratio Information
If your creation is anamorphic then you can put it in a Matroska container containing aspect ratio information. First install MKVToolnix – Matroska Tools. Then make your fan vid widescreen:
mkvmerge --aspect-ratio 0:16/9 -o final.mkv final.avi
Now put your fan vid (final.avi if it’s fullscreen, final.mkv if it’s widescreen) online!
Further Reading
DVD and CD “Backup”
Doom9
A news site, forum community, and the information source for DVD ripping. Read the sticky threads at the top of their Linux forum.
Hydrogenaudio Forums
All you need to know about audio encoding. Most of of it applies to, and some of it is specifically for, Linux.
Linux Digital Fansubbing Guide
Written in 2002, and it still works today.
State of the Art MPEG-2 (DVD) transcoding under UNIX
How to start with a DVD and end up with H264-encoded video in a Matroska container.
Mencoder DVD to OGM
Using mencoder to convert a DVD and its subtitles to OGM format.
Desktop Video
The Right Tool for the Job or Hobby
A recent set of Cinelerra video tutorials. The rest of this blog is actually dedicated to making AMVs with open source software in Linux. Well worth the read.
Rob Fishers’ Cinelerra tutorial.
LiVES Tutorial
Using the Linux-based video editor, LiVES, to make a fan video.
Tool-Assisted Console Game Movies
How to use a Linux box to capture videogame footage.
Filmmaking
Linux Movies Group
Professionals who use Linux for postproduction.
Creative Crash
High end film and video postproduction and 3D graphics. Check out their Linux forums.